Remote Servers
The dangers of using servers on compute nodes with direct port forwarding
Direct port forwarding should be avoided because it is insecure, any usage is at your own risk. Connections to exposed ports can be used by third parties (either accidentally or maliciously), which can expose your GPFS data and even grant access to launching commands using your HPC user.
Although we do not recommend it, it is quite common for users to use interactive tools like RStudio, Paraview or Jupyter Notebook using the client-server paradigm in HPC compute nodes. This enables the use of compute nodes "on demand" through these tools. To achieve this, the usual approach is to spawn a local client in a PC and then do a double port forward through the login node to reach a compute node, which was previously allocated through the job queue.
For example, the following diagram shows a common deployment and usage of a RStudio server, which is then accessed through a local client:

Each jump is performed using port forwarding through SSH. However, this method is very insecure since it relies on connections to exposed ports. These security vulnerabilities are easily exploitable, even by accident. Let's say that we have user A and user B. Both users want to use RStudio server, so they allocate a compute node each to run its remote server. Since they do not want to overcomplicate things, they both forward the default ports used by the server. The expected situation would be something like this:
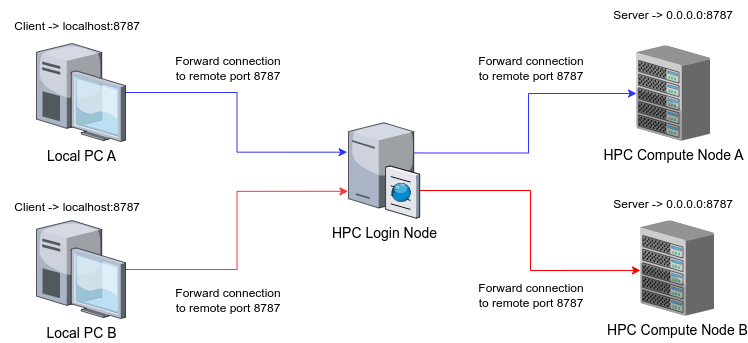
This is what generally would be expected, since they are trying to use different servers on different nodes. However, what would actually happen is that the second user doing the forwarding to the login node would conflict with the forwarding from the first user. Assuming that user A is the one that did the forwarding first, the actual situation would be the following:
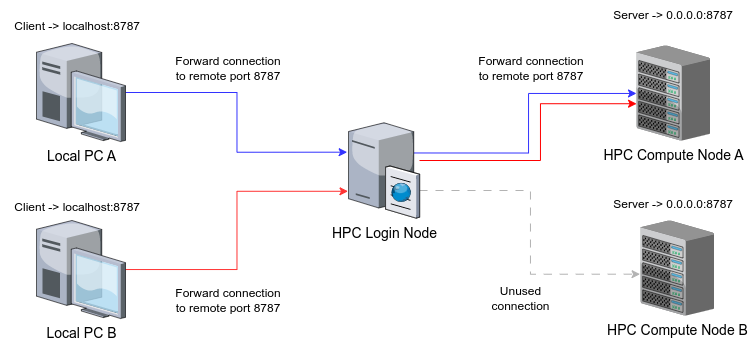
With this, users A and B could potentially use the same connection. Since the forwarding already exists, user B would be able to access the session of a remote server that has been already initialized with another user's credentials. This is the case in applications like RStudio, which grant access to other users' data directories. It is true that this can be mitigated by using different ports, but there is no guarantee that another user can use the same ones just by chance.
If direct port forwarding is dangerous, what is the more secure alternative?
Forwarding secure connections through Unix sockets
Since we can't (or shouldn't) use direct port forwarding, another way to achieve this connection securely is using Unix sockets. A Unix socket is represented like any other file, which implies that they are also affected by file permissions. Thanks to that, we can secure connections by creating sockets in secured directories that are only accessible for our own HPC user, and then forwarding our connections through them.
However, this is only one of the steps needed to secure a connection. To ensure that our connections are not accessible by other people, the following must be confirmed:
- We have exclusive use of the allocated compute node where our server runs.
- The server on the compute node is binded exclusively to address 127.0.0.1 (localhost) and is not visible on any other IP addresses.
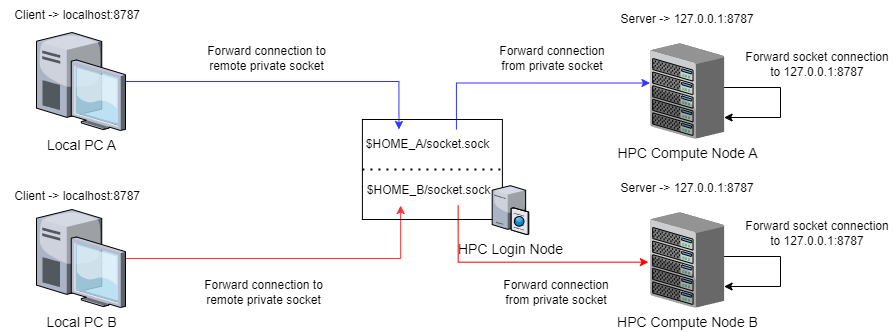
- Our connection is locally forwarded to a socket on the login node, and then this socket is also forwarded to compute_node->localhost:server_port.
If these directives are followed, the connection should look like this:

The mechanism used to forward the connections is SSH. If we have ensured that we have requested exclusive access of the compute node, we will be the only ones able to jump to it from the login node once the allocation takes place. Once we are inside the compute node, we can use "localhost:server_port" securely since it is only exposed to people with access to the node. The intermediate connection in the login node is secured because it doesn't directly use ports, it relies on a socket that is only accessible by the user that created it.
If we go back to the earlier example where users A and B wanted to concurrently use different instances of RStudio server, we can see that all port conflicts can be avoided and their connections do not collide at any point if this new method is used:
Specific steps to deploy and connect to remote servers
Creating and launching the jobscript for server execution
The connection forwarding steps are practically the same for all HPC clusters, the only changing aspects are the modules and commands used to spawn a server for different applications. The first step is to prepare a jobscript to allocate a node and spawn a server. You can use the following template as a base and adapt it to the specific HPC cluster and software to run:
#!/bin/bash
#SBATCH --job-name=remote_server
#SBATCH -D .
#SBATCH --output=server_%j.out
#SBATCH --error=server_%j.err
#SBATCH --ntasks=1
#SBATCH --cpus-per-task=<number_of_cpus_of_a_whole_node>
#SBATCH --time=12:00:00
#SBATCH --exclusive

# Load all required modules for you application here:
module load <needed modules for your remote server>

# Spawn your server, we will leave some typical examples with the required configuration

# For RStudio server (default port: 8787)
rserver --www-address=127.0.0.1

# For Paraview server (default port: 11111)
pvserver  --multi-clients --force-offscreen-rendering --hostname=127.0.0.1

# For JupyterLab / JupyterNotebook (default port: 8888)
jupyter notebook --no-browser --ip=127.0.0.1
If you use another server application that is not specified here, make sure that it can be run specifying which IP address to use. If IP 127.0.0.1 can't be specified and the server is left to listen incoming connections from any IP, it will become a vulnerability. Assuming that you have saved that jobscript in a file called "job.sh", you can then submit it to the scheduler with the following command:
sbatch job.sh
After that, just wait for your job to start its execution. Keep checking its state with "squeue":
squeue
             JOBID PARTITION     NAME     USER ST       TIME  NODES NODELIST(REASON)
          28156505      main interact bscxxyyy  R    0:00:05      1 s06r2b03
As soon as you see that it's running, copy the name of the node specified in the "NODELIST" section. You will need it later.
Create a connection from the login node to the compute node
Once your job is running, open up a new terminal session and log into the login node of the HPC cluster that you will be using. Once you have a session, you can create the connection from the login node to the compute node. Make sure that you first have created a directory that is only accessible for your user, since it will be where the socket is created. Do the following steps:
cd <private_directory>
# If there is a socket file present from a past connection, delete it first
rm socket.sock
ssh -L ./socket.sock:localhost:<server_port> <compute_node>
In the command above, <server_port> refers to the port used by your server and <compute_node> is the name of the node you got in the previous section. One you execute the ssh command, you will get a normal session inside the compute node. Leave it open, you won't need to do anything else with it. Now you will only need to create the remaining connection.
Create a connection from your local computer to the login node
Open up a terminal session in your local computer. After that, you only need to do the following:
ssh -L <server_port>:<path_to_your_private_directory>/socket.sock <hpc_username>@<hpc_login_node>
What we are doing is linking your local port to the socket we created earlier. This will spawn a ssh session, which you will also need to leave running. Once that is done, accessing to "localhost:<server_port>" in your local computer should be exactly the same as trying to connect to your remote server in a compute node, since we have forwarded the connection there.
For example, if we have a RStudio server running in our compute node using the default port and we have forwarded that port from there to our local computer, we should see a RStudio session if we access to "localhost:8787" from a web browser. It should look something like this:

This is just an example, not all remote servers are accessed from a web browser. Please refer to the documentation of the intended tool you wish to launch in order to know how to connect to the server. When you finish using it, you can close your running ssh sessions to undo the connections and cancel your job if you do not wish to use the server anymore. You can also delete the socket file created inside your private directory.
And with this, you have achieved a secure client-server paradigm using HPC compute nodes!